
So, I've had this extra A/C unit hanging around for a while and I was planning on making a lagering/aging chest with it, but when my chiller didn't quite get my wort down as much as I would have liked I decided to use the AC to chill it down and keep it in the optimum range during fermentation. The temp in my basement runs ~70-74 during the summer and I want to keep the fermenter at 65-68.Anyway, I built an uber-ghetto fermentation control chamber. I had bought a MiniBrew 15 gal conical from drez77 last year. It came with the stand he built (which was also ghetto), pretty much just a wood frame on wheels, about 2' square and 4' tall. All I did was screw an AC into the side of the framing, then slapped 4 pieces of plywood around the sides, no insulation. I used some double sided foam tape around the edges to get whatever seal I could, but it's still not sealed well at all. On the coldest setting the AC was keeping the temp at 60-63. It was cooling it down maybe 1/2 a degree per hour (at least according to the surface thermometer, which probably isn't so accurate in this case). I pitched when the surface temp read about 70F and i dialed the AC back a few notches. Hopefully, it will keep it under 70F throughout the fermentation. I know there are some others out there using ACs to control ferm temp, what are some of the tips and tricks for this setup?BTW, I'll post some pics later so you all can revel in my ghetto-ness.


Fermentation control via A/C
Started by
3rd party JKor
, Jul 06 2009 07:57 AM
20 replies to this topic
#1

3rd party JKor
-

- Patron
-

- 64190 posts
Puller of Meats
- LocationNW of Boston
Posted 06 July 2009 - 07:57 AM
#2
*_Guest_Blktre_*
*_Guest_Blktre_*
-

- Guests
Posted 06 July 2009 - 08:43 AM
For one, never monitor ambient air. Since your box isn't insulated and most likely has some leaks, monitoring ambient will cause the unit to run often and feeze up. Its best to get a WL vial and fill it with cold pak goo. I also drilled a hole in the cap and put a thermowell in it. The sensor then goes inside of this. The goo acts like a large volume. Since it takes alot more time for a large volume to change temp your unit wont run as often. At least use a small piece of foam insulation around the sensor and tape this to the outside of the conical. You can even add a thermowell inside the conical and put the sensor in there.Its also wise to use a external temp controller. I bypassed the internal temp controller on the unit. If you have a LCD panel instead of the old analog type dials, then im not much of a help bypassing the internal controller, but do remember over at the other board folks figuring it out. Dropping slowly as you already are doing is a wise decision. Its also wise to go ahead and insulate the inside of your box.Kansan, a brew buddy of mine who stops by here every so often has a setup as you describe except its large enough for a few fermenters. His gig works well for primary fermentation's.
Edited by Blktre, 06 July 2009 - 08:44 AM.
#3
3rd party JKor
-
- Patron
-
- 64190 posts
Puller of Meats
- LocationNW of Boston
Posted 06 July 2009 - 09:02 AM
Good idea on the WL vial. I did notice that it was cycling a lot once I got it running. Although, ideally you probably want the probe in the fermenter.I can understand bypassing the internal temp controller if you want to go below the limit of the built-in unit, but since I'm just using it for an ale ferment (right now) the internal TC can go low enough. Is there another reason to bypass the internal control?I'll probably fool around with it over the course of the next few weeks. Adding insulation, sealing things up, etc.
#4
DubbelEntendre
-

- Members
-
- 310 posts
Advanced Member
- LocationOhio
Posted 06 July 2009 - 09:09 AM
As mentioned, I would insulate. I recently built the Son of a Fermentation Chiller and that 2" extruded polystyrene really does the job. With 2 gallons of ice I can drop 5 gallons from 72F to 67F in about 15 minutes. On top of that it was holding at 62 without the fan even kicking on. I highly recommend that. I hacked up a $25 thermostat and extended the thermistor and tape it to the outside of the fermenting vessel.This page gives step by step on how to mod a digital thermostat, and includes info on how to add a relay for controlling 110VAC stuff instead of the little DC fan that the SoaFC uses.
#5
HVB
-

- Patron
-
- 18084 posts
No Life
Posted 06 July 2009 - 10:40 AM
you talk about it like ghetto is bad ..I had bought a MiniBrew 15 gal conical from drez77 last year. It came with the stand he built (which was also ghetto),
#6
djinkc
-

- Patron
-
- 32138 posts
Comptroller of Non-Defending Defenders of Inarticulate Twats
- Locationout the backdoor
Posted 06 July 2009 - 11:02 AM
Insulation is a good idea, if not required - your AC will run a lot less. Having a separate control and bypassing the AC control lets you dial in temps better which eventually you will want to do with different yeast strains. I have a 12v muffin fan mounted on the coils that runs continuously to keep it from icing up - which mine tries to do when the humidity is high - a container of damprid also helps with that. My probe is in a thermowell........That's all I can think of at the moment.
#7
3rd party JKor
-
- Patron
-
- 64190 posts
Puller of Meats
- LocationNW of Boston
Posted 06 July 2009 - 12:58 PM
You got the wrong impression then. I'm all about ghetto.you talk about it like ghetto is bad ..
#8
ChefLamont
-

- Members
-
- 9741 posts
Comptroller of Fear
- LocationAtlanta
Posted 06 July 2009 - 04:24 PM
I have an AC unit on my chamber. I have it wired to a controller. I also wired the fan to a separate switch so it will stay on all the time. This accomplishes pretty much the same thing as DJ is talking about with the muffin fans. There is a simple schematic on the internets that I used very successfully. I will see if I can find it.So I have three switches in the process. One turns on the fan. One turns on the controller, and one turns on the circuit to the compressor. I put the last one in so if I am messing with the controller or something the conplressor wont cycle on and off while I am tinkering.
#9
3rd party JKor
-
- Patron
-
- 64190 posts
Puller of Meats
- LocationNW of Boston
Posted 06 July 2009 - 08:20 PM
As promised...picsThe naked fermenter: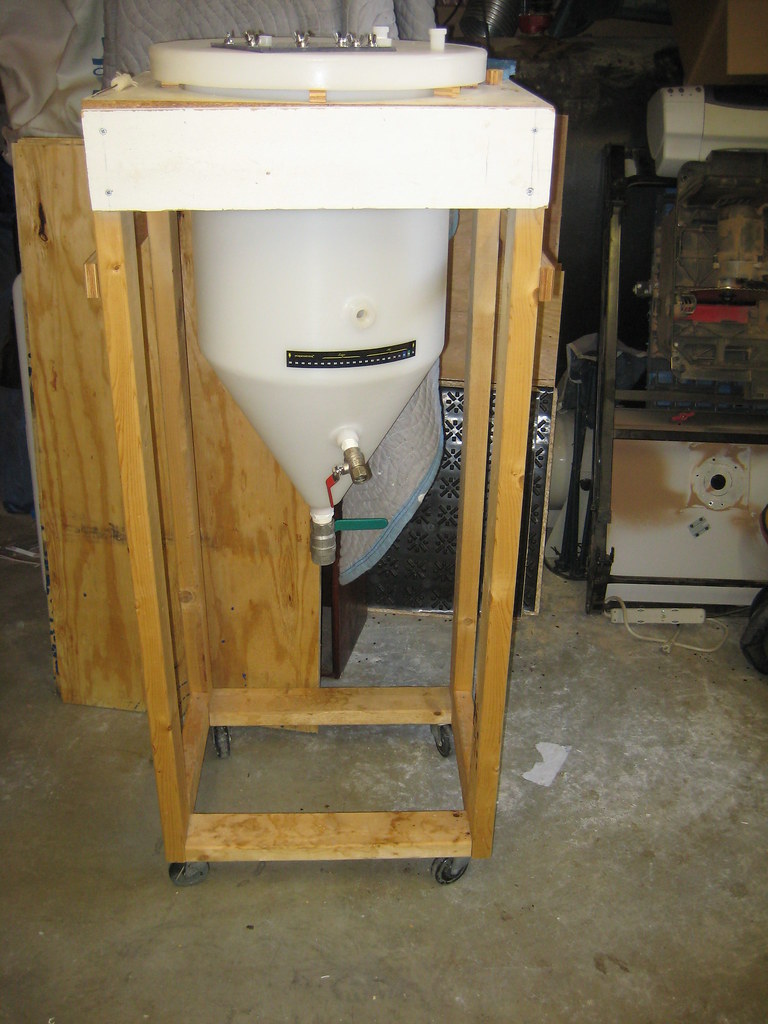 I also added a viewing window in the lid over the weekend. I had the acrylic sheet and vinyl gasketing, but the stainless hardware was almost $20 at HD. Now that there's beer in there I'm glad I did it. I like being able to see the beer without lifting the lid.
 Finally, the ferm chamber. I cut another window into the side door so I can see the temp strip.
 At the bare minimum, I'll pop an analog thermometer through the 1/2" NPT tap right above the ferm strip (you can see it through the window) for the next batch. That'll give me a more accurate temp reading, I think the ferm strip is running a few degrees high. If I have time, I'll probably do a thermocouple probe. I have a temp controller and all the necessary parts to do the full monty, the question is whether I'll get to it.
I also added a viewing window in the lid over the weekend. I had the acrylic sheet and vinyl gasketing, but the stainless hardware was almost $20 at HD. Now that there's beer in there I'm glad I did it. I like being able to see the beer without lifting the lid.Finally, the ferm chamber. I cut another window into the side door so I can see the temp strip.At the bare minimum, I'll pop an analog thermometer through the 1/2" NPT tap right above the ferm strip (you can see it through the window) for the next batch. That'll give me a more accurate temp reading, I think the ferm strip is running a few degrees high. If I have time, I'll probably do a thermocouple probe. I have a temp controller and all the necessary parts to do the full monty, the question is whether I'll get to it.
#10
Salsgebom
-

- Members
-
- 131 posts
Advanced Member
- LocationNorth Carolina
Posted 06 July 2009 - 09:18 PM
a little off topic but I see some major sanitation issues there. Those valves will need to be taken off, all threads (M and F) thoroughly cleaned, teflon tape replaced, and everything reassembled while wet with sanitizer before each batch.
#11
Kansan
-

- Members
-
- 115 posts
Advanced Member
- LocationLawrence, KS
Posted 06 July 2009 - 09:29 PM
It make take a day or so, but I'll see if i can snap a few pics and figure out how to post them on the forum here. My basement runs in the low to mid 70's in the summer and I have no problem going down into the mid forties for lagering. My ghetto box will just hold a 15 gal conical and four 6.5 carboys (a tight, but cozy fit) with an ac unit hanging on the side. A 1/2 inch ply on the outside, and 1/2 Styrofoam topped with a layer of that silver coated bubble rap on the inside. keeps the temps just fine... Just brewed a Kolsch yesterday and the fermenter is perking just fine at a steady 62 degrees. An insulated box is your friend, and if at all possible a thermo well in the fermenting wort with your probe nestled inside.Kansan, a brew buddy of mine who stops by here every so often has a setup as you describe except its large enough for a few fermenters. His gig works well for primary fermentation's.
#12
Stout_fan
-

- Patron
-
- 3115 posts
Frequent Member
- LocationKnoxville, TN
Posted 07 July 2009 - 04:57 AM
A small mechanical point. If I'm getting this wrong please correct me.It appears the sides are nailed into the ends of the bottom 2x4s which serve as wheel mounts.If nailed in, that's bad. If screwed together, a little better.The fastener is in shear.Nails hold real lousy in end grain.Wood also splits along the grain.Placing the uprights on top of the bottom sections would have been a better approach.Other than that, pretty cool. 
#13
HVB
-
- Patron
-
- 18084 posts
No Life
Posted 07 July 2009 - 05:13 AM
I think you are talking about the original stand. I take the not so good credit for that. It was put together really fast so that the conical could be used. Then I bought the Blichman and never fixed the old stand. It was all screwed with 3" screws, glued with tightbond II and I believe the casters are on there with lag bolts.Some ghetto construction I am not really proud of .. But it does work ....
#14
*_Guest_Blktre_*
*_Guest_Blktre_*
-
- Guests
Posted 07 July 2009 - 06:03 AM
As long as it works, who cares?But it does work ....
#15
3rd party JKor
-
- Patron
-
- 64190 posts
Puller of Meats
- LocationNW of Boston
Posted 07 July 2009 - 06:03 AM
I never really looked all that closely at the stand, myself. I agree, that joint isn't structurally ideal, although if the caster plates are overlapping the vertical supports it probably alleviates the issue to a degree (it looks like they are, but it's hard to tell from the picture). In any case, I don't think there's enough shear to be a major issue and (hopefully) the stand is temporary until I build a larger unit that can hold multiple fermenters and secondaries.A small mechanical point. If I'm getting this wrong please correct me.It appears the sides are nailed into the ends of the bottom 2x4s which serve as wheel mounts.If nailed in, that's bad. If screwed together, a little better.The fastener is in shear.Nails hold real lousy in end grain.Wood also splits along the grain.Placing the uprights on top of the bottom sections would have been a better approach.Other than that, pretty cool.
Yes, but I don't consider those major issues.a little off topic but I see some major sanitation issues there. Those valves will need to be taken off, all threads (M and F) thoroughly cleaned, teflon tape replaced, and everything reassembled while wet with sanitizer before each batch.
Edited by JKoravos, 07 July 2009 - 06:04 AM.
#16
3rd party JKor
-
- Patron
-
- 64190 posts
Puller of Meats
- LocationNW of Boston
Posted 07 July 2009 - 08:06 PM
I hooked up a Kill-A-Watt energy meter to the AC last night, in 24 hrs it used up ~2.6 kWh of electricity. That equates to about $0.466/day in energy cost. Not too bad. It'll be interesting to see what the reading is once the system is sealed up and better insulated.
#17
Kansan
-
- Members
-
- 115 posts
Advanced Member
- LocationLawrence, KS
Posted 08 July 2009 - 01:35 PM
Well here are a few pics of my fermentation controller. It has a 5,000 BTU ac unit hanging on the side, and is up on three-high cinder blocks so that gravity racking into kegs is easy. it'll take the conical and four 6.5 gallon carboys. Pretty efficient setup if I do say so myself.[attachment=124:outferm.JPG][attachment=125:inferm.JPG]
#18
Kansan
-
- Members
-
- 115 posts
Advanced Member
- LocationLawrence, KS
Posted 08 July 2009 - 01:38 PM
sorry, guess I need to work on posting pics a little better next time...
#19
3rd party JKor
-
- Patron
-
- 64190 posts
Puller of Meats
- LocationNW of Boston
Posted 08 July 2009 - 01:52 PM
What's the framing like? Did you design any thermal breaks into the system, or is it just a typical framing configuration.
#20
Kansan
-
- Members
-
- 115 posts
Advanced Member
- LocationLawrence, KS
Posted 09 July 2009 - 04:07 PM
Just 2x4 construction all the way with deck screws, three extra 2x4s on the floor for extra support, then screwed plywood all around. it is just a box with a support on one side to mount the ac unit. Used some expanding crack sealer on all the seams, then took liquid nails and stuck 1/2 Styrofoam all around. Then stapled the silver bubble wrap on top of the Styrofoam. A pretty basic box all in all. I overlapped one of the door seams with an extra two inches of bubble wrap, and made a lip on the bottom of the door floor that folds up when we close the doors, and on the sides as well, to keep any air from falling out theoretically. The doors cinch pretty tight to the frame when closed and locked. Drilled a hole in the top for the Ranco probe to fit through so it can snake down into a thermo-well in the fermenter. That is pretty much it. Oh yeah, had to take the built-in thermo probe out of the ac unit so its internal circuitry would not cycle the unit off till the Ranco tells it too.
0 user(s) are reading this topic
0 members, 0 guests, 0 anonymous users

